
From Zero to Hero: Write your first Kubernetes charm > Create a minimal Kubernetes charm
See previous: Set up your development environment
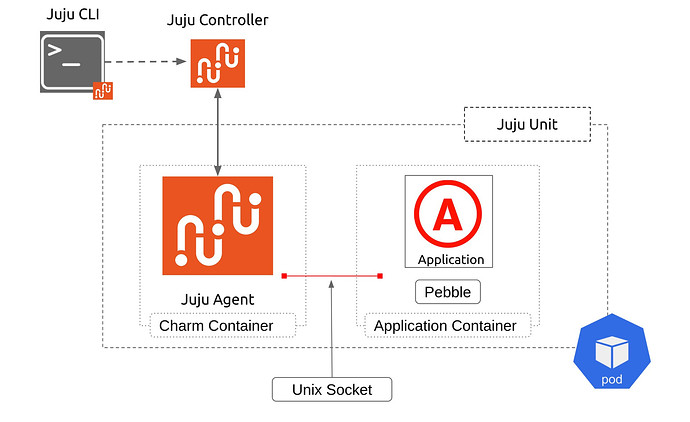
As you already know from your knowledge of Juju, when you deploy a Kubernetes charm, the following things happen:
- The Juju controller provisions a pod with two containers, one for the Juju unit agent and the charm itself and one container for each application workload container that is specified in the
containersfield of a file in the charm that is calledcharmcraft.yaml. - The same Juju controller injects Pebble – a lightweight, API-driven process supervisor – into each workload container and overrides the container entrypoint so that Pebble starts when the container is ready.
- When the Kubernetes API reports that a workload container is ready, the Juju controller informs the charm that the instance of Pebble in that container is ready. At that point, the charm knows that it can start communicating with Pebble.
- Typically, at this point the charm will make calls to Pebble so that Pebble can configure and start the workload and begin operations.
Note: In the past, the containers were specified in a
metadata.yamlfile, but the modern practice is that all charm specification is in a singlecharmcraft.yamlfile.
All subsequent workload management happens in the same way – the Juju controller sends events to the charm and the charm responds to these events by managing the workload application in various ways via Pebble. The picture below illustrates all of this for a simple case where there is just one workload container.
Refresh your memory: Juju | Kubernetes deployment
As a charm developer, your first job is to use this knowledge to create the basic structure and content for your charm:
- descriptive files (e.g., YAML configuration files like the
charmcraft.yamlfile mentioned above) that give Juju, Python, or Charmcraft various bits of information about your charm, and - executable files (like the
src/charm.pyfile that we will see shortly) where you will use Ops-enriched Python to write all the logic of your charm.
Content:
- Set the basic information, requirements, and workload for your charm
- Define the charm initialisation and application services
- Add logger functionality
- Tell Charmcraft how to build your charm
- Validate your charm
- Review the final code
Set the basic information, requirements, and workload for your charm
Create a file called charmcraft.yaml. This is a file that describes metadata such as the charm name, purpose, environment constraints, workload containers, etc., in short, all the information that tells Juju what it can do with your charm.
Read more: File
charmcraft.yaml
In this file, do all of the following:
First, add basic information about your charm:
name: demo-api-charm
title: |
  demo-fastapi-k8s
description: |
  This is a demo charm built on top of a small Python FastAPI server.
  This charm could be related to PostgreSQL charm and COS Lite bundle (Canonical Observability Stack).
summary: |
  FastAPI Demo charm for Kubernetes
Second, add an environment constraint assuming the latest major Juju version and a Kubernetes-type cloud:
assumes:
  - juju >= 3.1
  - k8s-api
Read more:
assumes
Third, describe the workload container, as below. Below, demo-server is the name of the container, and demo-server-image is the name of its OCI image.
containers:
  demo-server:
    resource: demo-server-image
Read more:
containers
Fourth, describe the workload container resources, as below. The name of the resource below, demo-server-image, is the one you defined above.
resources:
  # An OCI image resource for each container listed above.
  # You may remove this if your charm will run without a workload sidecar container.
  demo-server-image:
    type: oci-image
    description: OCI image from GitHub Container Repository
    # The upstream-source field is ignored by Juju. It is included here as a reference
    # so the integration testing suite knows which image to deploy during testing. This field
    # is also used by the 'canonical/charming-actions' Github action for automated releasing.
    upstream-source: ghcr.io/canonical/api_demo_server:1.0.1
Read more:
resources
Define the charm initialisation and application services
Create a file called requirements.txt. This is a file that describes all the required external Python dependencies that will be used by your charm.
Read more: File
requirements.txt
In this file, declare the ops dependency, as below. At this point you’re ready to start using constructs from the Ops library.
ops >= 2.11
Read more: Ops (
ops)
Create a file called src/charm.py. This is the file that you will use to write all the Python code that you want your charm to execute in response to events it receives from the Juju controller.
Read more:
src/charm.py
This file needs to be executable. One way you can do this is:
chmod a+x src/charm.py
In this file, do all of the following:
First, add a shebang to ensure that the file is directly executable. Then, from the Ops library, import the CharmBase class and the main function. Then, use CharmBase to create a charm class FastAPIDemoCharm and then invoke this class in the main function of Ops. As you can see, a charm is a pure Python class that inherits from the CharmBase class of Ops and which we pass to the main function defined in the ops.main module.
#!/usr/bin/env python3

import ops

class FastAPIDemoCharm(ops.CharmBase):
    """Charm the service."""

    def __init__(self, framework):
        super().__init__(framework)

if __name__ == "__main__":  # pragma: nocover
    ops.main(FastAPIDemoCharm)
Read more:
CharmBase
Now, in the __init__ function of your charm class, use Ops constructs to add an observer for when the Juju controller informs the charm that the Pebble in its workload container is up and running, as below. As you can see, the observer is a function that takes as an argument an event and an event handler. The event name is created automatically by Ops for each container on the template <container name>-pebble-ready. The event handler is a method in your charm class that will be executed when the event is fired; in this case, you will use it to tell Pebble how to start your application.
framework.observe(self.on.demo_server_pebble_ready, self._on_demo_server_pebble_ready)
Read more:
<container name>-pebble-ready
Generally speaking: A charm class is a collection of event handling methods. When you want to install, remove, upgrade, configure, etc., an application, Juju sends information to your charm. Ops translates this information into events and your job is to write event handlers
Pro tip: Use __init__ to hold references (pointers) to other Objects or immutable state only. That is because a charm is reinitialised on every event. See Talking to a workload: Control flow from A to Z.
Next, define the event handler, as follows:
We’ll use the ActiveStatus class to set the charm status to active. Note that almost everything you need to define your charm is in the ops package that you imported earlier - there’s no need to add additional imports.
Use ActiveStatus as well as further Ops constructs to define the event handler, as below. As you can see, what is happening is that, from the event argument, you extract the workload container object in which you add a custom layer. Once the layer is set you replan your service and set the charm status to active.
def _on_demo_server_pebble_ready(self, event):
    """Define and start a workload using the Pebble API.

    Change this example to suit your needs. You'll need to specify the right entrypoint and
    environment configuration for your specific workload.

    Learn more about interacting with Pebble at at https://juju.is/docs/sdk/pebble.
    """
    # Get a reference the container attribute on the PebbleReadyEvent
    container = event.workload
    # Add initial Pebble config layer using the Pebble API
    container.add_layer("fastapi_demo", self._pebble_layer, combine=True)
    # Make Pebble reevaluate its plan, ensuring any services are started if enabled.
    container.replan()
    # Learn more about statuses in the SDK docs:
    # https://juju.is/docs/sdk/constructs#heading--statuses
    self.unit.status = ops.ActiveStatus()
The custom Pebble layer that you just added is defined in the self._pebble_layer property. Update this property to match your application, as follows:
In the __init__ method of your charm class, name your service to fastapi-service and add it as a class attribute :
self.pebble_service_name = "fastapi-service"
Finally, define the pebble_layer function as below. The command variable represents a command line that should be executed in order to start our application.
@property
def _pebble_layer(self):
    """Return a dictionary representing a Pebble layer."""
    command = " ".join(
        [
            "uvicorn",
            "api_demo_server.app:app",
            "--host=0.0.0.0",
            "--port=8000",
        ]
    )
    pebble_layer = {
        "summary": "FastAPI demo service",
        "description": "pebble config layer for FastAPI demo server",
        "services": {
            self.pebble_service_name: {
                "override": "replace",
                "summary": "fastapi demo",
                "command": command,
                "startup": "enabled",
            }
        },
    }
    return ops.pebble.Layer(pebble_layer)
Read more: How to configure the Pebble layer
Add logger functionality
In the src/charm.py file, in the imports section, import the Python logging module and define a logger object, as below. This will allow you to read log data in juju.
import logging

# Log messages can be retrieved using juju debug-log
logger = logging.getLogger(__name__)
Read more:
juju debug-log
Tell Charmcraft how to build your charm
In the same charmcraft.yaml file you created earlier, you need to describe all the information needed for Charmcraft to be able to pack your charm. In this file, do the following:
First, add the block below. This will identify your charm as a charm (as opposed to something else you might know from using Juju, namely, a bundle).
type: charm
Read more:
type
Also add the block below. This declares that your charm will build and run charm on Ubuntu 22.04.
bases:
  - build-on:
    - name: ubuntu
      channel: "22.04"
    run-on:
    - name: ubuntu
      channel: "22.04"
Read more:
bases
Aaaand that’s it! Time to validate your charm!
Pro tip: Once you’ve mastered the basics, you can speed things up by navigating to your empty charm project directory and running charmcraft init --profile kubernetes. This will create all the files above and more, along with helpful descriptor keys and code scaffolding.
Validate your charm
First, ensure that you are inside the Multipass Ubuntu VM, in the ~/fastapi-demo folder:
multipass shell charm-dev
cd ~/fastapi-demo
Now, pack your charm project directory into a .charm file, as below. This will produce a .charm file. In our case it was named demo-api-charm_ubuntu-22.04-amd64.charm; yours should be named similarly, though the name might vary slightly depending on your architecture.
charmcraft pack
# Packing the charm
# Created 'demo-api-charm_ubuntu-22.04-amd64.charm'.
# Charms packed:
#    demo-api-charm_ubuntu-22.04-amd64.charm
If packing failed - perhaps you forgot to make the charm.py executable earlier - you may need to run charmcraft clean before re-running charmcraft pack. charmcraft will generally detect when files have changed, but will miss only file attributes changing.
Did you know? A .charm file is really just a zip file of your charm files and code dependencies that makes it more convenient to share, publish, and retrieve your charm contents.
Deploy the .charm file, as below. Juju will create a Kubernetes StatefulSet named after your application with one replica.
juju deploy ./demo-api-charm_ubuntu-22.04-amd64.charm --resource \
     demo-server-image=ghcr.io/canonical/api_demo_server:1.0.1
If you’ve never deployed a local charm (i.e., a charm from a location on your machine) before:
As you may know, when you deploy a charm from Charmhub it is sufficient to run juju deploy <charm name>. However, to deploy a local charm you need to explicitly define a --resource parameter with the same resource name and resource upstream source as in the charmcraft.yaml.
Monitor your deployment:
juju status --watch 1s
When all units are settled down, you should see the output below, where 10.152.183.215 is the IP of the K8s Service and 10.1.157.73 is the IP of the pod.
Model        Controller           Cloud/Region        Version  SLA          Timestamp
charm-model  tutorial-controller  microk8s/localhost  3.0.0    unsupported  13:38:19+01:00

App             Version  Status  Scale  Charm           Channel  Rev  Address         Exposed  Message
demo-api-charm           active      1  demo-api-charm             1  10.152.183.215  no

Unit               Workload  Agent  Address      Ports  Message
demo-api-charm/0*  active    idle   10.1.157.73
Now, validate that the app is running and reachable by sending an HTTP request as below, where 10.1.157.73 is the IP of our pod and 8000 is the default application port.
curl 10.1.157.73:8000/version
You should see a JSON string with the version of the application:
{"version":"0.0.9"}
Expand if you wish to inspect your deployment further
- Run:
kubectl get namespaces
You should see that Juju has created a namespace called charm-model.
- Try:
kubectl -n charm-model get pods
You should see that your application has been deployed in a pod that has 2 containers running in it, one for the charm and one for the application. The containers talk to each other via the Pebble API using the UNIX socket.
NAME                             READY   STATUS    RESTARTS        AGE
modeloperator-5df6588d89-ghxtz   1/1     Running   3 (7d2h ago)    13d
demo-api-charm-0                 2/2     Running   0               7d2h
- Check also:
kubectl -n charm-model describe pod demo-api-charm-0
In the output you should see the definition for both containers. You’ll be able to verify that the default command and arguments for our application container (demo-server) have been displaced by the Pebble service. You should be able to verify the same for the charm container (charm).
Congratulations, you’ve successfully created a minimal Kubernetes charm!
Review the final code
For the full code see: 01_create_minimal_charm
For a comparative view of the code before and after our edits see: Comparison
See next: Make your charm configurable
Contributors: @abatisse, @beliaev-maksim, @dkazants, @maabujayyab, @mylesjp, @nsakkos, @orfeas-k, @ppasotti, @rsyring, @tony-meyer, @tmihoc